

In-mold decoration integrates graphics or decorative finishes into the injection molding cycle. It can reduce separate printing or painting operations and give plastic housings, control panels, and trim parts a consistent visual identity.
The first specification decision is the decoration method. Industry terminology varies, and the label “IMD” alone does not establish whether a film remains on the finished component. That difference affects the layer structure, tooling, artwork, and durability tests.
Two decoration routes to distinguish
Transfer-film decoration
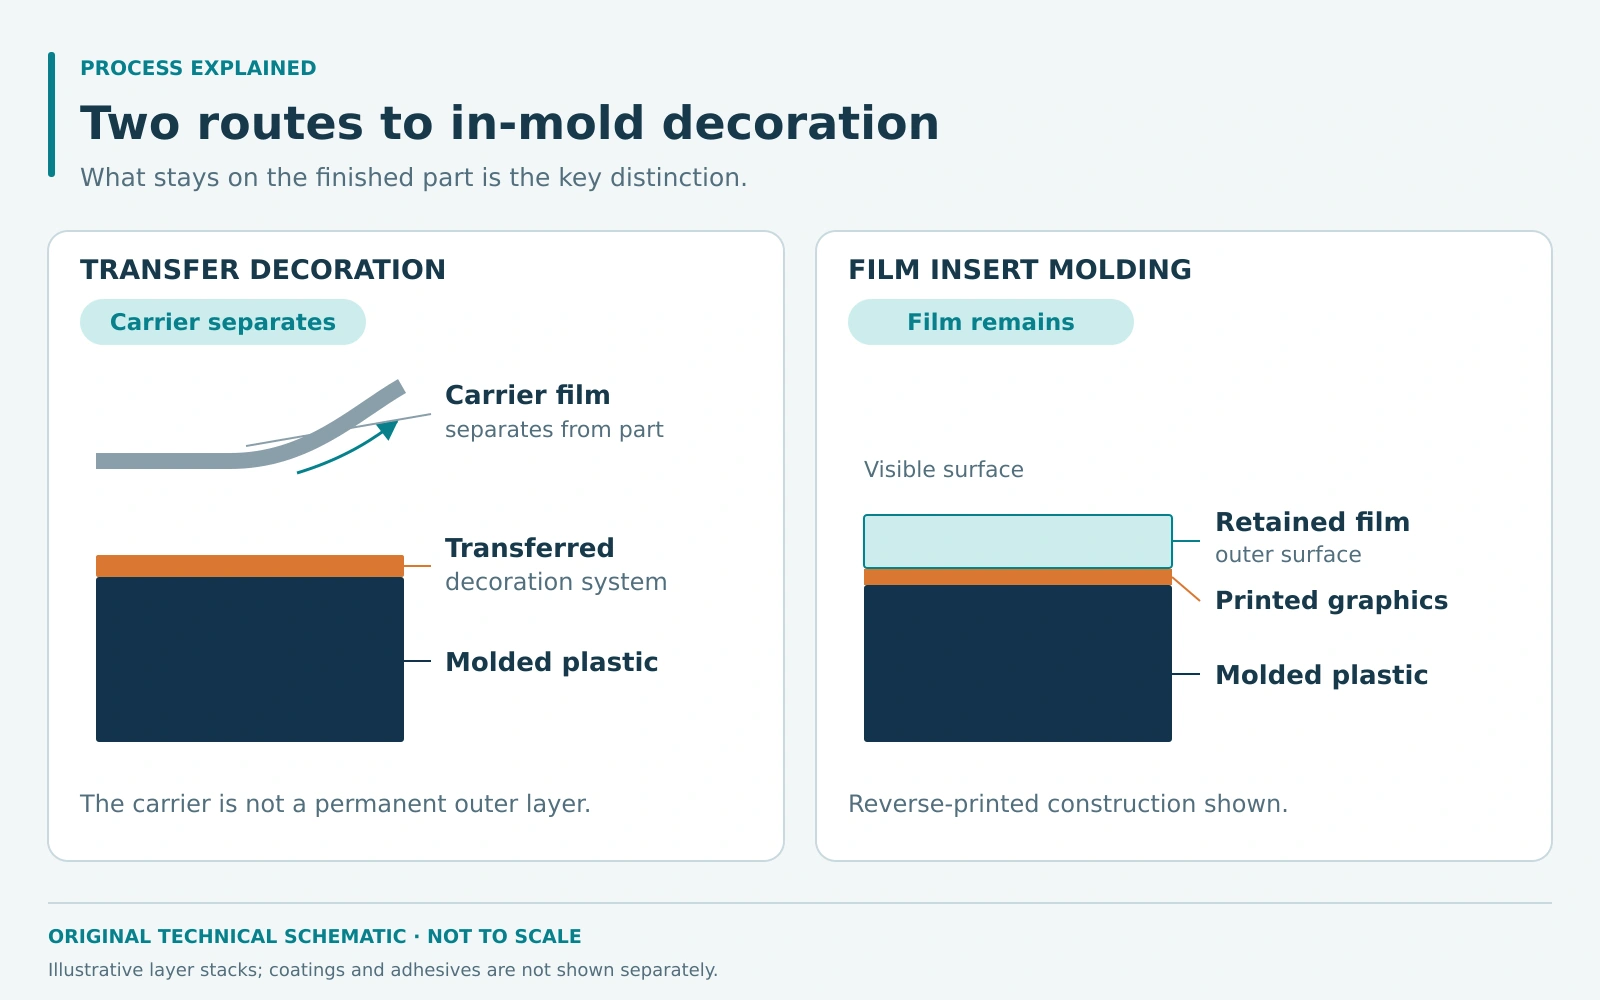
In a transfer process, a carrier film positions the decorative layers inside the mold. Heat and contact with the injected plastic enable the decoration to bond to the component and separate from the carrier. The carrier itself does not become the permanent outer film of the part.
Roll-fed systems advance the decorated strip between molding cycles. Registration must keep each graphic aligned with the cavity. KURZ and KraussMaffei describe this transfer approach in their IMD process information.
Film insert molding
Film insert molding, or FIM, uses a printed plastic film that becomes part of the component. Depending on the geometry, the film is formed and trimmed before placement in the injection mold. Plastic is then molded behind or around it.
With a suitable reverse-printed construction, the graphics sit behind the visible film surface. Covestro describes FIM as a type of in-mold decoration. In a drawing or purchase specification, identify the actual construction rather than relying on the acronym alone.
How to develop a decorated part
- Define the appearance. Establish colors, graphic positions, texture, gloss, and any transparent or backlit areas. Identify which surfaces users will touch and clean.
- Select the material system. Evaluate the film or transfer layers, inks, coatings, and molding resin together. Compatibility and adhesion need to survive the molding process and the intended use.
- Prepare the artwork and film. Film inserts may need forming and trimming. Graphics must account for the final shape and required registration.
- Integrate the mold and handling. Plan accurate film positioning and controlled filling. Film movement, contamination, or damage to the printed layers can create visible rejects.
- Validate finished components. Compare molded samples with approved appearance standards and test the complete decoration system.
Benefits and practical limits
In-mold decoration can combine several manufacturing steps and support detailed graphics, metallic effects, or selected gloss levels. Different artwork may allow product variants to share the same basic molded geometry.
Durability is a specification to prove. Scratch, abrasion, chemical, and UV resistance depend on the exposed surface and selected coating system. Neither transfer decoration nor FIM makes every printed surface inherently resistant to every cleaner or environment.
Deep contours, sharp transitions, and demanding graphic alignment deserve early review. Film forming and handling introduce their own process requirements, and decorative complexity can increase development effort. For low volumes or frequently changing designs, compare the total cost with suitable post-molding decoration methods.
The important distinction is the finished layer structure: a transferred decoration and a retained film create different design possibilities. Selecting a route means matching that structure to the shape, внешний вид, wear, and environmental demands of the product.